Quick Start
- Drag And Drop VFX Prefab from the “CompleteEffectsPrefabs” folder into your scene.
- Make the Enchant VFX Prefab a child of the Mesh you want to apply Effect into.
- Reset the Tranfrosm of the MeshRaycast VFX Prefab, be sure that Positions and Rotations are at 0.0, and Scale is at 1.0.
- Select the Mesh Renderer in the attached C# Scripts, you can just drag the Parent Mesh object into the “Mesh” variable slot.
- !!! Make sure that the Mesh you selected has “Read/Write” enabled, it is required to get all the vertex info.
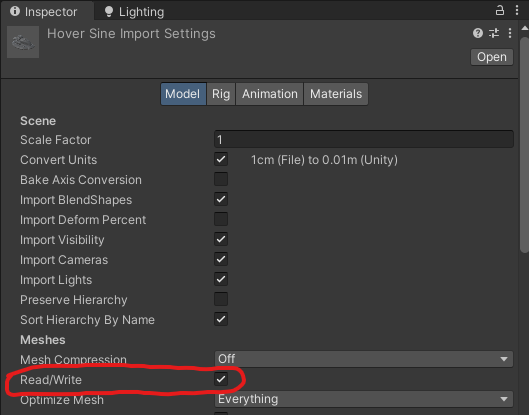
- It is also recommended to use a special invisible mesh for raycasting, you can just disable its Mesh Renderer component, but not remove it.
- Enable “Preview Cells In Editor” and “Show Normals Hit Distance”.
- Adjust the “Cells Scale” parameter to set the optimal Cell sizes, check the screenshot below.
- Set the “Min Distance” to a low value, then you can adjust it in real-time. This parameter determines the minimum distance between two points used to generate a lightning strip.
- With Auto Scale Enabled you can adjust the “Mesh Auto Scale Multiply” or “Master Scale” to scale the VFX Elements.
- After all the above, you can now freely move and scale your mesh.
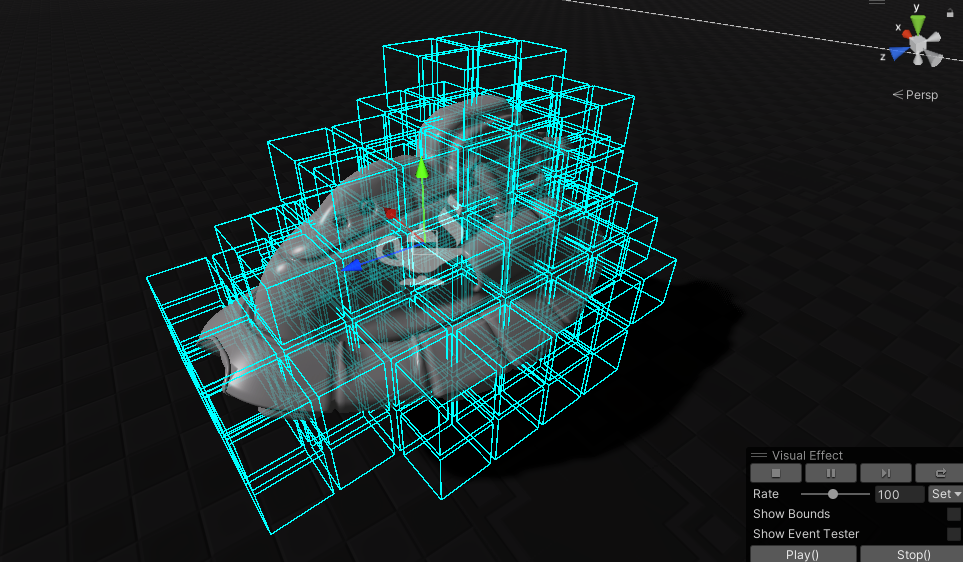
Most of the additional adjustments come from the Visual Effects Graph parameters and C# script. Many parameters can be changed, you can control the color, speed, overall shape of the strips, noise scale, etc.
Common Adjustments
- (Scale) If AutoScale is enabled, the effect will be scaled along with the Mesh it is attached to. Effect elements can be scaled with “Mesh Auto Scale Multiply” or “Master Scale”. There are also four MASTER Scale parameters at the top of the VFX Graph settings.
- (Color) Color can be changed in the Visual Effects Graph parameters. It is separated between each effect element. There is also a master color, so you can set all the element color parameters to white and change the master color to find the right hue.
- (Speed) The Speed at which the effect is triggered can be controlled in the C# script, check the “Speed” parameter.
List Of VFX Graph Parameters
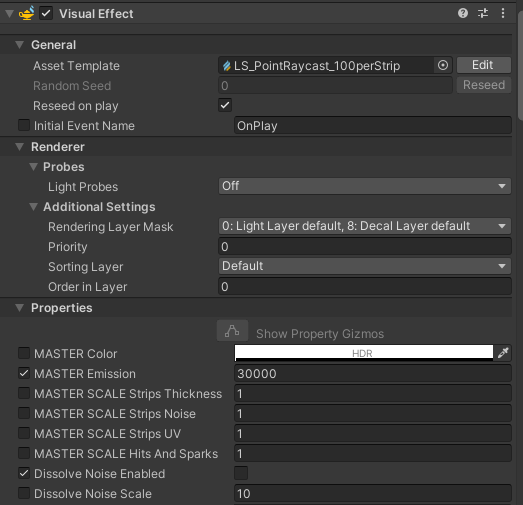
- Move Local Enabled - Makes the Enchant VFX fully local, strips will no longer linger behind when moving the enchanted mesh.
- MASTER - These parameters serve as a final layer of adjustments, they just multiply existing parameters by themselves.
- Dissolve Noise - Use Dissolve instead of a regular alpha decay for lightning strips.
- Lightning - This set of parameters controls the color, gradient transitions, and emission power of VFX elements.
Strips:
- Strips Texture - Main texture for lightning strips.
- Strips EoL - Emission Over Lifetime.
- Strips SAoL - Size and Alpha Over Lifetime.
- Strips UV Stretch and Center UV - Stretching the UV, and the other parameter is used to center the lightning strips at the Start and the End points.
- Strips To Center - Using the “Center UV” helps texture to adjust the UV of the lightning strip, making it more visually pleasing.
- Strips Noise - Controls the Offset Noise that makes lightning look like lightning.
- Strips Noise PoL - Noise Power (Offset Intensity) over Lifetime.
- Strips NPoL - Noise Position over Lifetime.
Hit:
- Hit Texture - Main texture used for hit effects.
- Hit SoL - Size over Lifetime.
- Hit EoL - Emission over Lifetime.
- Hit Move To Camera Fix - Moves the hit quad sprite in the direction of a Camera. Useful to adjust the world geometry intersection of screen space quads.
Source parameters:
- Source - Parameters to adjust the source Hit effects.
Main Strip:
- Main Strip Lifetime and Hit Lifetime - Lifetime in seconds of the Main Strip and Main Strip Hit effects.
- Main Strip Profile - Thickness profile of a lightning strip.
- Main Strip Noise Mask Profile - Profile that controls the amount of Offset Noise applied to a lightning strip.
- Main Strip EoL - Emission over Lifetime.
- Main Strip AoL - Alpha over Lifetime.
- Main Strip B - Parameters that control the overall shape and emission of the second and third Main Strips. The amount of Main Strips can be changed in a C# script, check the “Min and Max Numbers Of Main Strips” parameters.
Branched Strip:
- Branched Lifetime and Hit Lifetime - Lifetime in seconds of the Branched Strip and Branched Strip Hit effects.
- Branched Profile - Thickness profile of a lightning strip.
- Branched EoL - Emission over Lifetime.
- Branched AoL - Alpha over Lifetime.
- Branched Start Min and Max - Adjust the initial point from which the Branched Strip can be branched.
- Branched Noise Blend - Blends between Main and Branched Offset Noises, don’t change too much.
Arc:
- Arc Initial Power - Controls the Arc initial offset.
- Arc PoL - Controls the Arc Offset over lifetime.
Other Parameters:
- Transition - Add a small touch to a lightning strip, making it appear more solid at the start and end points.
- SDF - Slot for a baked SDF, check the instructions below.
- Disable Parameters - These are used to disable some parts of VFX, that are not needed.
- HIDDEN Parameters - VFX Graph Won’t allow hidden parameters to be changed from outside, so these are currently visible, don’t change them.
Baking SDF For Better Visuals
SDF (Signed Distance Field) is used to create better visuals for the Enchant Effect. With SDF, lightning stips will now try to curve around the mesh, avoiding the intersections. You can bake the SDF for your mesh using Unity Tools, navigate Windows > Visual Effect > Utilities > SDF Bake Tool. Set the desired resolution, click “Fit Box To Mesh”, then click Bake Mesh. After all of this, you can save the SDF. But before this, save all the transform parameters, “Box Center” and “Desired Box Size”.
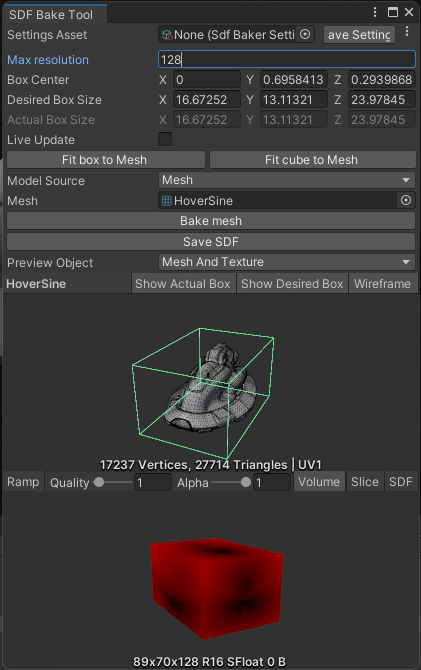
Now enable the “SDF Enabled” parameter, set the baked SDF Texture, and paste the saved transform parameters in an “SFD Center” and “SDF Size”.

List Of C# Script Parameters
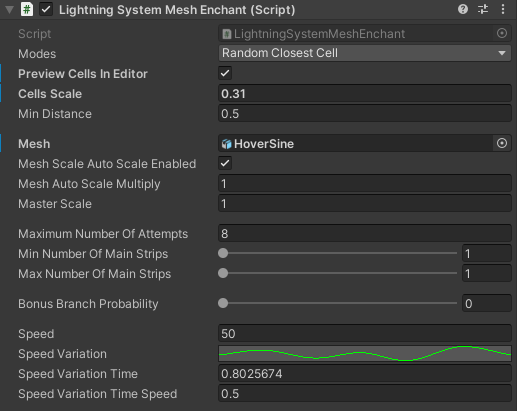
- Modes - Two modes with self-explanatory names, the first one will create a lightning strip between two adjusted cells, and the other one with any other cell.
- Preview Cells In Editor - Use this to preview the Cell Gizmos in the Editor to adjust the Cell Sizes.
- Min Distance - Minimum allowed distance between two points in Local Space.
- Mesh - Mesh to which the VFX will be applied.
- Mesh Scale Auto Scale Enabled - Enabled the AutoScale, now the VFX Elements will be scaled with the mesh.
- Mesh Scale Auto Scale Enabled Multiply - Multiply the AutoScale parameter by this value.
- Master Scale - Act like the previous parameter, it scales the VFX elements, I just separated these two for visual clarity.
- Maximum Number Of Attempts - Control the number of failed Raycast attempts, use low value for better optimization.
- Min Number Of Main Strips - Set the min and max count of spawned Lightning Strips.
- Man Number Of Main Strips - Set the min and max count of spawned Lightning Strips.
- Bonus Branch Probability - Probability to spawn an additional lightning strip.
- Speed - Speed in which the VFX and Raycast are triggered.
- Speed Variation - Speed variation curve, to make the VFX appear more natural.
- Speed Variation Time - Displayed Variation Time, useful for very dynamic Variation Time curves.
- Speed Variation Time Speed - Speed in which Time Variation is changing.
- Random Branched Circle Min Radius - Branched strips are triggered using Sphere Raycast, these parameters control min and max radius.
- Random Branched Circle Max Radius - Branched strips are triggered using Sphere Raycast, these parameters control min and max radius.